The book Bootstrapping Microservices with Docker, Kubernetes, and Terraform by Ashley Davis does a good job of taking you through each building block incrementally, with a great amount of detail. You can buy it on Amazon or access through ACM via Skillsoft / Percipio. However, it is focused on Azure services. I was willing to go along with that in the interest of getting through the core learning faster, but I found myself trying to solve Azure issues. At that point following Azure steps wasn’t helping, but getting in the way. Since eventually I would need to figure out how to do all this on Amazon Web Services (AWS), I thought I would document the steps I took so that others who are reading that book could basically follow the author, but work on AWS.
So here we go!
Chapter 3
Chapter 3 is the first place the book has you use Azure. I didn’t actually have problems here, in that I did create the container registry on Azure and used it, but in the interest of making an all-AWS path for the book, we’ll discuss how to create the container on AWS.
You’ll need four things.
- An AWS account
- ‘aws’ command line on your workstation or VM
- An Identity and Access Management (IAM) user
- An Elastic Container Registry (ECR) repository
Amazon loves acronyms; their service names are ridiculously unhelpful, though these are less whimsical than many. The need for an account is probably obvious; AWS gives away free services just like Microsoft so you should be able to do this for no out-of-pocket costs. Even if you already have AWS, these are very low cost services at the scale we will be using for this exercise.
Create an Account
Head to https://aws.amazon.com with your favorite browser. The upper right button will either say “Create an AWS Account” or “Sign into the Console”, the latter if cookies are telling AWS that you have an account. You can click the “Sign in to the console” button and the resulting page has a create button, if you need a new account. Here you will create a “Root User” account to get started. Use one of your existing email accounts and it will send you a verification code to enter. After verifying you enter your root password.
The root user is the super user of your account and if it is compromised you could be out a great deal of money, so choose wisely. You will have to provide a credit card as well as plenty of other information, and answer two or three captchas. You can make that go away by adding a new identity with IAM for your administrative work, but I recommend you do that on your own after following the next section, where we create an identity for the rest of the work here. The root login is intentionally difficult to use so that you only do so when you really need to. Bare minimum, you should add multi-factor authentication (MFA) using a mobile phone app or text message to the root account. But that just adds, to security, you’ll still need to answer the captcha each time for a root account login.
Create an IAM user
If you aren’t already positioned at the IAM dashboard, click the “services” icon to the right of the AWS logo at the top which looks like this: ![]() , and select IAM if it’s visible. If it’s not visible, click ‘All Services’ and scroll through the alphabetically-ordered list to get to IAM, and click it.
, and select IAM if it’s visible. If it’s not visible, click ‘All Services’ and scroll through the alphabetically-ordered list to get to IAM, and click it.
Click “Users” on the left, then the “Add users” button upper right. For this exercise we’re going to create a new user with name “microservices” . The credential type in this case is “Access Key” for programmatic access. Hit the “next” button and it will have selected “add user to group” and allow you to create a group by clicking a button. Click it now.
For this exercise we will name the new group “container-admin” which will just have the permissions required to administer containers. As we need more functionality we’ll add more groups and add those groups to our user. In the filter box enter “container”, then click the box next to “AmazonEC2ContainerRegistryFullAccess” the “Create Group”, then “Next: Tags”, then “Next: Review” and finally “Create User”
Now you have to note the credentials for that user. You won’t get another chance, so I recommend downloading the csv, naming it something memorable like “microservices_user_aws_credentials.csv” and saving it in a secure location.
To create administrative users the process is the same, and you choose what services you really need for most of your work. The most critical one is administrative access to IAM, but for security purposes it might make sense to leave that to the root user.
Get the aws command line interface (CLI)
The Vagrant file didn’t work for me or I might have not bothered with this AWS exercise right now. The rest of this document assumes you will install natively on your workstation.
This varies by system, so I recommend you visit https://docs.aws.amazon.com/cli/latest/userguide/getting-started-install.html and follow the instructions for your system
Create the Registry
You can create a new profile for command line access using ‘aws configure’. If you don’t already have a profile, you can create a new one by naming it on the command line such as
aws configure --profile microservicesBy naming different profiles you can quickly switch between IAM users and even AWS accounts. As part of this configuration step, you can choose the region where your AWS services will run. For this exercise choose one near you from the list available on the drop down in your browser at the upper right just to the left of your login name. For example us-west-2 which is in Oregon. Setting your default region will save you some typing.
To choose which profile the AWS cli will use, set the environment variable AWS_PROFILE as in:
export AWS_PROFILE=microservicesIn Ashley Davis’s book, we are doing the same thing he discusses in 3.9.1 called a “Private Container Registry”. The full command to do the equivalent in AWS at the command line now is:
aws ecr create-repository --repository-name bmdk1 --profile microservices --region us-west-2That produces output that includes the URL you’ll need for the docker push command in AshleyDavis’s book. It looks like the following:
{
    "repository": {
        "repositoryArn": "arn:aws:ecr:us-west-2:#############:repository/bmdk1",
        "registryId": "##############",
        "repositoryName": "bmdk1",
        "repositoryUri": "##########.dkr.ecr.us-west-2.amazonaws.com/bmdk1",
        "createdAt": "2022-03-18T11:45:59-07:00",
        "imageTagMutability": "MUTABLE",
        "imageScanningConfiguration": {
            "scanOnPush": false
        },
        "encryptionConfiguration": {
            "encryptionType": "AES256"
        }
    }
}
What you need to note is the repositoryUri value. In the example output I replaced the numbers for my repository ID with ########.
The name bmdk1 is from Ashley’s book; it’s arbitrary but normally you would choose something intuitively meaningful.
Now we’re going to have docker authenticate to our new registry. The easiest way to get these commands exactly right is to look at the registry on the logged-in browser, and click the button labelled “View Push Commands”. These are easy to mess up and the resulting errors are not helpful. To use those if you have a special profile requires that you add the –profile to the docker login command. Here’s a working example with the Repository ID blocked out, the region specified in case there is no default, and the profile microservices assuming you created the profile with aws configure:
aws ecr get-login-password --region us-west-2 --profile microservices | docker login --username AWS --password-stdin ############.dkr.ecr.us-west-2.amazonaws.comNote that the last parameter is the repositoryUri from the create command, but with the repository name removed from the end.
Next you need to build the docker image unless you’ve already done that
docker build . -t bmdk1Then we tag the image so docker push knows what we mean
docker tag bmdk1:latest ############.dkr.ecr.us-west-2.amazonaws.com/bmdk1:latestFinally docker can push to our new registry.
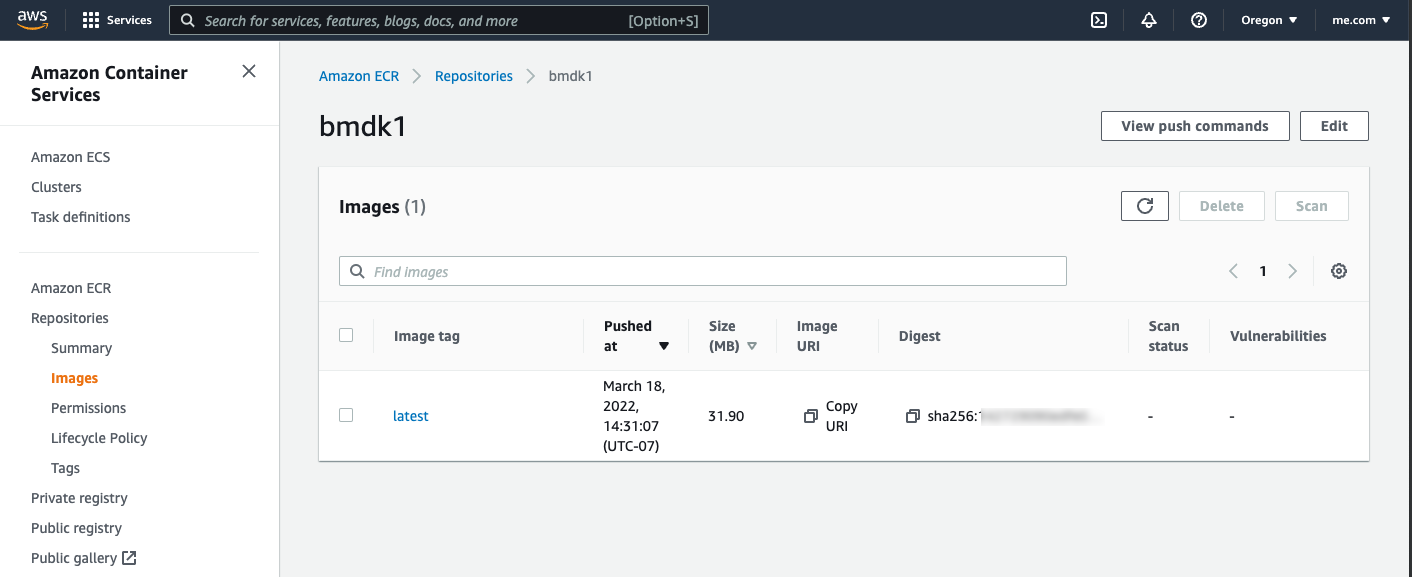
docker push #############.dkr.ecr.us-west-2.amazonaws.com/bmdk1:latestSo now you are caught up to the book, except at the end of 3.9.2 Ashley checks the pushed image in the GUI. You can do the same on AWS and the repositories and image views look like the following.

The next chapters 4 and 5 don’t need AWS so we’ll pick up at Chapter 6.
Chapter 6
The section 6.6 is mostly about working with the Azure CLI. We just went over the AWS cli in the previous section; so you can skip 6.6 in the book. We’ve already worked with the ecr subcommand. Azure’s subcommand for Kubernetes is ‘aks’; AWS calls it ‘eks’ for “Elastic Kubernetes Service” — AWS really likes the term ‘elastic’. AWS does not provide EKS version information at the CLI; it is covered in their online documentation. There is really nothing to do with EKS at the command line prior to creating a cluster, which we will do shortly using Terraform.
What we will do here to prepare is add EKS permission to our IAM user. Log into AWS as the root user or an admin if you set that up, and go to IAM. We’re going to create another group for admin access to EKS. Kubernetes is called K8S for short in some circles, so let’s create a new group called k8s-admin. Click on user groups on the left, then “Create Group”, then check the box next to your microservices user to add to this new group. I tried adding individual EKS permissions, but there was no obvious one for “All Permissions” so instead, select “create inline policy“, then enter this in the JSON tab
{
    "Version": "2012-10-17",
    "Statement": [
        {
            "Sid": "VisualEditor0",
            "Effect": "Allow",
            "Action": "eks:*",
            "Resource": "*"
        }
    ]
}
The user also needs admin access to EC2. So repeat that create group exercise, adding a group called ec2-admin, and adding your user to that group, and giving it full EC2 access.
The user also needs admin access to IAM. Repeat again with iam-full-access.
Failing to do this will result in permission problems during terraform apply, but it may not be obvious what the issue is.
Terraform
We’re going to take a slight left turn and create a full-on K8S cluster with terraform in AWS, just so we verify we have all the permissions correct. Then we’lll come back to Ashley’s book.
Make sure you’ve installed Kubernetes so you have access to Kubectl. Next we’ll grab some starting configuration from HashiCorp. In the book, section 6.9.1, they are going to run terraform init. We are too, but let’s configure properly first. Run the following command in a directory separate from what you cloned for the book.
git clone https://github.com/hashicorp/learn-terraform-provision-eks-cluster
At this point you should follow the tutorial at https://learn.hashicorp.com/tutorials/terraform/eks using the clone you just pulled. The clone needs only one change – add your profile name in the vpc.tf file. Optionally change the region here from Terraform’s default as well, so the top might look like this:
variable "region" {
  default     = "us-west-2"
  description = "AWS region"
}

variable "profile" {
  default = "microservices"
  description = "AWS profile for use by Terraform "
}

provider "aws" {
  region = var.region
  profile = var.profile
}
You’ll need to add the –profile to the end of the update-kubeconfig command in the tutorial:
aws eks --region $(terraform output -raw region) update-kubeconfig --name $(terraform output -raw cluster_name) --profile microservicesAt the end of that side tutorial you will have a Kubernetes dashboard on your browser. But for ease of reference here is how you get the dashboard:
kubectl apply -f admin-user.yaml
kubectl apply -f dashboard-adminuser.yaml
kubectl apply -f https://raw.githubusercontent.com/kubernetes/dashboard/v2.7.0/aio/deploy/recommended.yaml
kubectl create token admin-user
kubectl proxy
Using the files as shown at https://github.com/kubernetes/dashboard/blob/master/docs/user/access-control/creating-sample-user.md (the first file is admin-user.yaml and the second is dashboard-adminuser.yaml)
Then point your browser at http://localhost:8001/api/v1/namespaces/kubernetes-dashboard/services/https:kubernetes-dashboard:/proxy/
You’ll be directed to a login page where you can supply the token you generated above.
Section 6.9 Creating the registry with Terraform
This one is actually shocking easy once you’ve done the previous section. Inspired by https://www.sysopsruntime.com/2021/07/10/create-elastic-container-registry-ecr-in-aws-with-terraform/, I created a new repository based on Ashley’s repo, but AWS-ized it.
Clone https://github.com/jpa57/bootstrapping-microservices-chapter-6.git and visit example-2 to use Terraform to create the flixtube container registry.
Section 6.10
Section 6.10 discusses variables, which we used to set our profile earlier. The best practice is to factor those variables into a small number of .tf files that the user will modify to suit their needs.
Section 6.11
This section is similar to what you did creating the cluster using files supplied by Hashicorp, and this chapter doesn’t help the AWS user. We have not replaced the example 3 code in the GitHub fork since the Hashicorp tutorial worked fine for our current needs. For Chapter 7, we will integrate the book assets with the Hashicorp assets for a one-stop shop of deploying microservices to the cluster.
Section 6.12
In 6.12.1 the book talks about Azure’s interaction with Kubernetes to connect them. The equivalent section in the Hashicorp tutorial for AWS shows this line one line command that connects AWS and K8S, in this case using an assumed profile called microservices:
aws eks --region $(terraform output -raw region) update-kubeconfig --name $(terraform output -raw cluster_name) --profile microservicesThe rest of 6.12 is applicable, but it similar to the Hashicorp tutorial. The kubectl command to create the dashboard is here for ease of copying:
kubectl apply -f https://raw.githubusercontent.com/kubernetes/dashboard/v2.0.4/aio/deploy/recommended.yamlI stopped at the kubectl proxy command on aws.
Chapter 7
For this section, clone the forked repository into a new working directory
git clone https://github.com/jpa57/bootstrapping-microservices-chapter-7.gitFor example 1, we will deploy MongoDB to a container in our cluster and verify it works with a database browser. We’ll review the files after we deploy and test. Note that the forked repository has a parallel directory to the author’s scripts directory, called aws. This allows easy comparison and updates of the content from the bae repository if needed.
cd bootstrapping-microservices-chapter-7/example-1/aws
terraform init
terraform apply
aws eks --region $(terraform output -raw region) update-kubeconfig --name $(terraform output -raw cluster_name) --profile microservices
kubectl get services
That final kubectl command will give you the IP address of the MongoDB instance to connect to using your favorite database browser. As of this writing Robo 3T is now called Studio 3T
Example 2
For example 2, it’s really the same but the author has added rabbitmq.tf. After terraform appl, update-kubeconfig, and Kubectl get services, note the name of the rabbitmq management server and browse there on port 15672; login with guest/guest and you are on your way to example 3.
Example 3
A key to the port of example 3 is to get the secrets right that allow the images to be pulled from the repository. I found this reference helpful
https://stackoverflow.com/questions/62328683/how-to-retrieve-a-secret-in-terraform-from-aws-secret-managerTo use that I went into the AWS admin UI and created a secret of type “other” that included the account id, the user and the password. You basically construct JSON key/value pairs, then we can fetch the string and parse not JSON in the terraform files. The ARN of the secret is asked for at the start of terraform apply, unless the variable is supplied one the command line. Our front of the video-streaming.tf file deals with these secrets and pulls them into local variables.
data "aws_secretsmanager_secret" "secrets" {
  arn = var.secret_arn
}

data "aws_secretsmanager_secret_version" "current" {
  secret_id = data.aws_secretsmanager_secret.secrets.id
}

locals {
    service_name = "video-streaming"
    account_id = jsondecode(nonsensitive(data.aws_secretsmanager_secret_version.current.secret_string))["ACCOUNT_ID"]
    username =   jsondecode(nonsensitive(data.aws_secretsmanager_secret_version.current.secret_string))["USER_NAME"]
    password =   jsondecode(nonsensitive(data.aws_secretsmanager_secret_version.current.secret_string))["PASSWORD"]
    login_server = "${local.account_id}.dkr.ecr.${var.region}.amazonaws.com"
    image_tag = "${local.login_server}/${var.app_name}:${var.app_version}"
}
In reality we should have chosen AWS terms for these, because what gets stored in the secrets manage are the credentials for a programmatic identity in IAM. So the USER_NAME will be loaded with an “Access Key Id” and PASSWORD will be loaded with the “Secret Access Key”. These credentials must have the ability to push to and pull from ECR.
Even the account ID is hidden from source, though it is generally agreed that the account ID is not sensitive. As suggested by Ashley’s book, we supply variables on the command line, which presently will look like this with your own secret ARN:
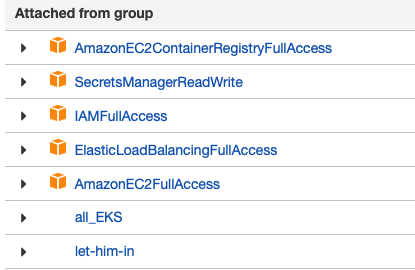
terraform apply --var="app_version=1" --var="secret_arn=arn:aws:secretsmanager:us-west-2:1234567890:secret:Microservices-training-j4QbD9a" --auto-approveTO make this example work I also needed to add more permissions.. The existing set of permission sis shown in this image
One f the things I learned the hard way is that AWS does not support the sessionAffinity of “ClientIP”. Removing it from the spec for the kubernetes_service, along with the selector, at least allocated an external IP address. However,
$ aws eks --region $(terraform output -raw region) update-kubeconfig --name $(terraform output -raw cluster_name) --profile microservices

$ kubectl get services
NAME              TYPE           CLUSTER-IP       EXTERNAL-IP                                                              PORT(S)        AGE
database          ClusterIP      172.20.141.21    <none>                                                                   27017/TCP      120m
kubernetes        ClusterIP      172.20.0.1       <none>                                                                   443/TCP        125m
rabbit            ClusterIP      172.20.120.60    <none>                                                                   5672/TCP       120m
video-streaming   LoadBalancer   172.20.129.112   a0423b605b5aa4863a28c180298444d1-567482012.us-west-2.elb.amazonaws.com   80:32697/TCP   122m
From which we should be able to go to http://a0423b605b5aa4863a28c180298444d1-567482012.us-west-2.elb.amazonaws.com/video and see the application running.
If you struggle like I did, it might be instructive to visit the log files in each service. In this example, we’ve deployed the database and rabbitMQ, but they aren’t actually doing anything. The video application is not calling them yet. In my case I was getting a disconnect because I had removed the selector statement in the kubernetes_service declaration. All the log files ended up telling me is that the video-streaming application was never being hit; that led me to review changes and found the missing statement.
To enable looking at log files in your pods, first apply this yaml file:
$ kubectl apply -f https://k8s.io/examples/debug/counter-pod.yamlThen, find the names of your pods so you can ‘follow’ their log files.
$ kubectl get pods
NAME                              READY   STATUS    RESTARTS   AGE
counter                           1/1     Running   0          20m
database-6d6ccf57fb-w8qf4         1/1     Running   0          126m
rabbit-f5cbc8fbf-gjw8s            1/1     Running   0          126m
video-streaming-97675cd9d-mknff   1/1     Running   0          126m
Now to tail the log file for the video service for example:
$ kubectl logs -f  pods/video-streaming-97675cd9d-mknff


> video-streaming@1.0.0 start /usr/src/app
> node ./src/index.js

Microservice online.
Along the way I also added some debugging statements in video-streaming/src/index.js to verify port numbers, which then appeared in the log output, so it was quite helpful.
At this point the services are all deployed and running, though only the video service is doing anything useful. It takes more than 12 minutes to deploy this cluster from start to finish. It takes 3 minutes to destroy.
Chapter 7.7 – pipelines
I started to work on porting this to AWS with GitHub and perhaps Terraform Cloud for state storage… and where do you run ‘docker’? But after reading this reference:
https://stackoverflow.com/questions/59410652/how-to-use-a-docker-file-with-terraform
Particularly the answer by Martin Atkins, I decided that we should wait for Chapter 11 where Ashley said we will remove the ‘hackiness’ of doing everything in one step in Terraform. So I’ll leave this port for others who are interested in example-4, and am removing that from my GitHub repo.
Things I worked on for Chapter 7 example 4
These may be helpful for later work n Chapter 11. Stay tuned.
Since I’m more of a GitHub person, and the workflow for GitHub looks a bit easier that BitBucket for AWS, I’m going to cover doing this with GitHub and Terraform Cloud in lieu of BitBucket with S3 and DynamoDB, which I think is where you would end up otherwise, from this reference.
The first thing you might want to do is learn a bit about Terraform Cloud. Start here, and sign up for a free account here.
I thought I’d run the little demo here https://github.com/hashicorp/tfc-getting-started . You need to be on linux, I believe, to follow that. OS X barfed on the setup script. I used a Ubuntu 18.04 VM and installed terraform and jq, getting a warning message which I ignored:
[GFX1-]: glxtest: libEGL missing methods for GL test
I only followed it as far as the apply.
Then back on app.terraform.io, I created an organization for this project, and a workspace. Creating the workspace made me choose from various VCS providers including GitHub. That authenticated to GitHub and asked for permission to install Terraform there, and which repositories to include. I said all, but that was for that organization, not for this workspace. A workspace is 1:1 with a single repository.
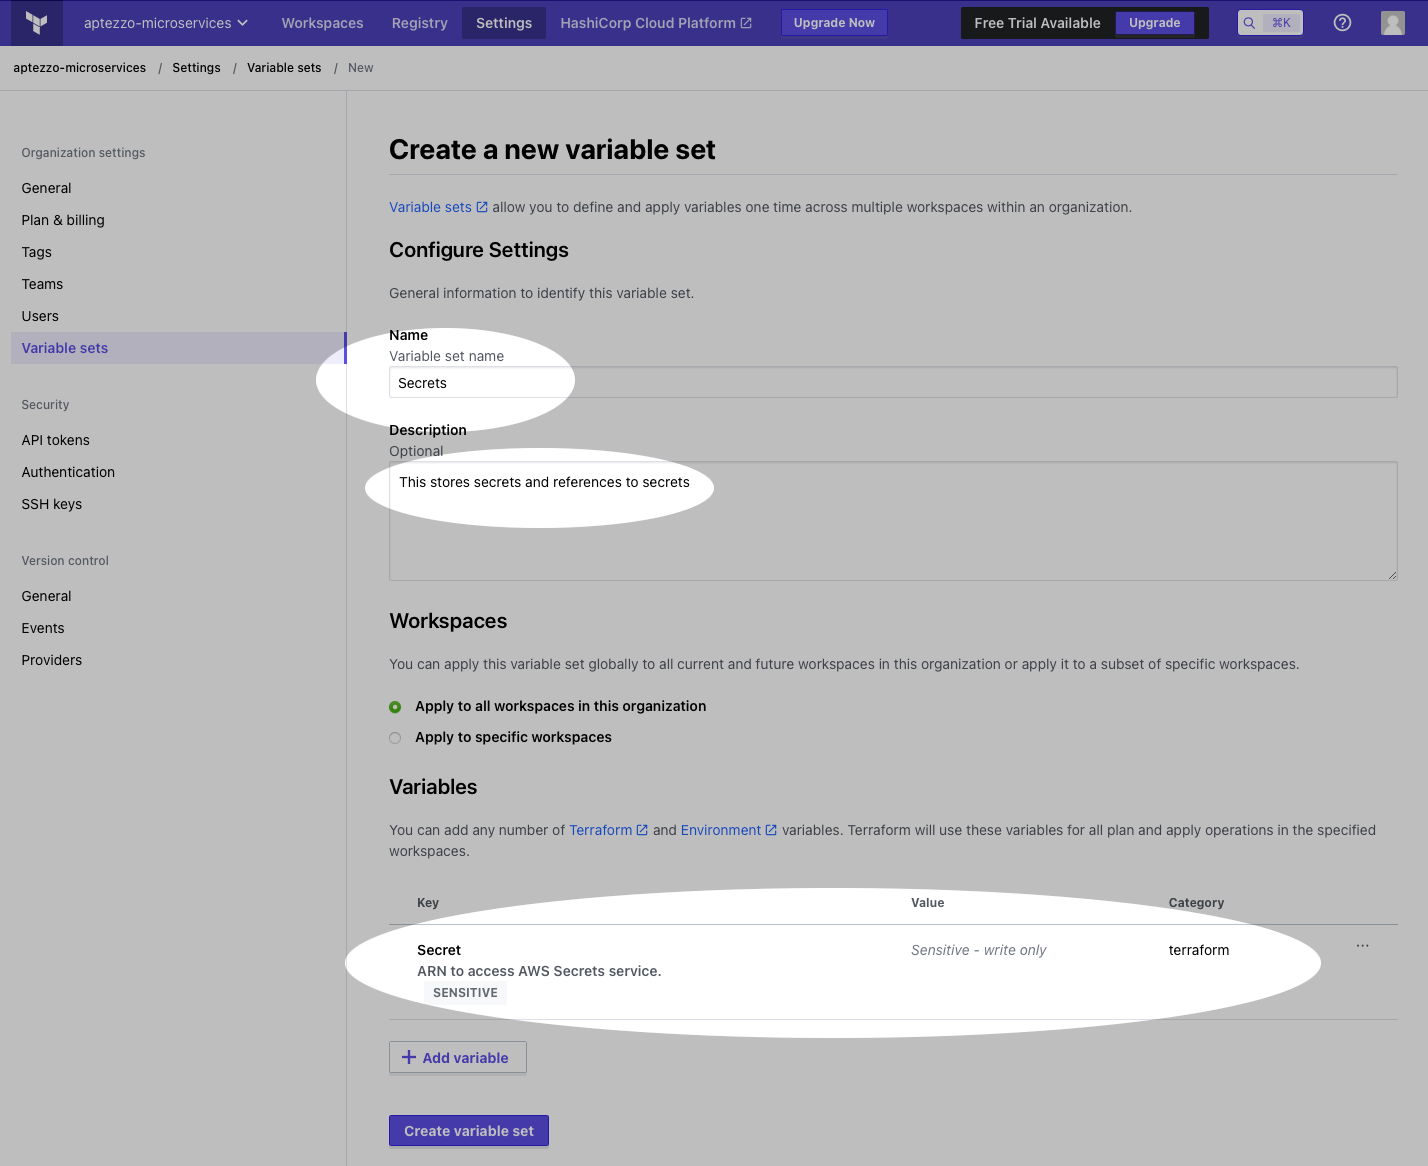
Because the previous work stored secrets in AWS secrets manager, and that is helpful for manual execution, I decided to keep that structure and just store the ARN of the secret collection in Terraform’s variable set. So to follow along, click settings at the top, variable sets on the left, and create a new one. I called mine ‘Secrets’ and assume that I might store other secrets in here, but for now it’s just the ARN of the secrets stored earlier. By selecting the ‘sensitive’ button, people can’t read that secret, including yourself, from this interface; it’s write-only.
Chapter 9
References
https://blog.heptio.com/setting-up-the-kubernetes-aws-cloud-provider-6f0349b512bd
But of all the references, this was the most complete: https://itnext.io/kubernetes-part-2-a-cluster-set-up-on-aws-with-aws-cloud-provider-and-aws-loadbalancer-f02c3509f2c2